The quiet zone: the white border your QR code can't live without
That empty margin around your QR code is not padding. It is part of the code. Here is how much you need, and what quietly eats it after you download the file.
Your QR code came with a white border around it. It looks like padding. It looks like the sort of thing you trim off to make a layout tighter, or crop away when you drop the image into Canva.
It is not padding. That border is the QR code quiet zone, and the scanner needs it as much as it needs the black squares. Take it away and you get a code that looks perfect on screen and fails on paper.
Most articles about this stop at the definition. The useful part is different: your generator almost certainly added the quiet zone for you. So the question is not how to create one. It is what happens to it in the twenty minutes between download and print.
What the QR code quiet zone actually does
A phone camera does not see a QR code. It sees a photo of a table, or a flyer, or a menu, and it has to find the code inside that photo first.
It does that by hunting for the three big squares in the corners. Those are called finder patterns, and they have a fixed proportion the camera can look for: dark, light, dark, in a 1:1:3:1:1 ratio when you scan a line straight through one. The camera runs that check across the whole image until it hits three matches that form a right angle.
The quiet zone is what makes those corner squares stand out. It is the blank margin that separates the code from everything else in the photo. Without it, the headline sitting right next to your code becomes part of the pattern the camera is measuring, and the ratio breaks. The code is intact. The camera just never finds it.
That is why a code with no margin often does not fail slowly. It fails completely. There is no partial scan, no hold it closer. Nothing happens at all.
The 4-module rule, and how to check it without measuring anything
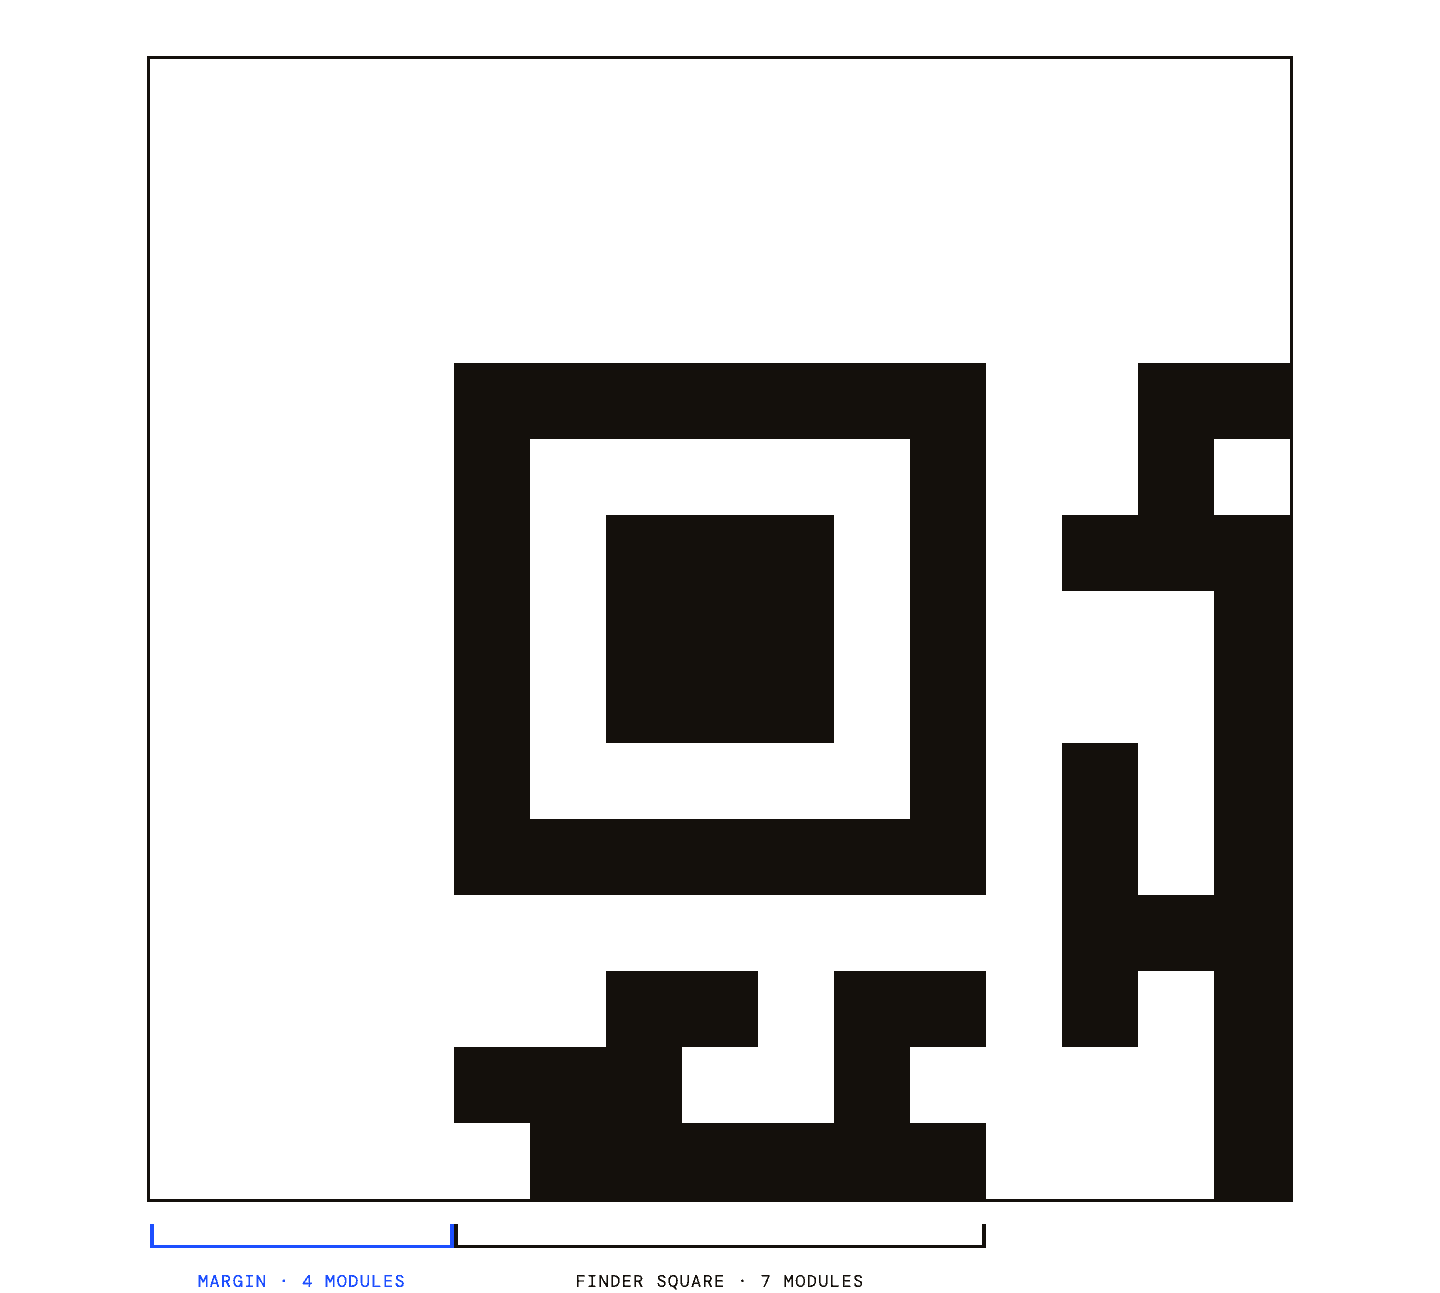
The standard is specific. ISO/IEC 18004, the spec that defines QR codes, requires a clear margin of four modules on all four sides. A module is one small square in the grid.
Four modules is not a width in millimeters. It scales with your code. If each square in your code is 1 mm across, you need 4 mm of margin. If each square is 0.5 mm, you need 2 mm. Shrink the code and the required margin shrinks with it, which is why resizing a code is safe and cropping it is not.
Here is what that comes out to in practice.
| Where it goes | Code width | Squares across | Quiet zone per side |
|---|---|---|---|
| Business card | 2.5 cm | 29 | 3.5 mm |
| Table tent or menu | 5 cm | 33 | 6 mm |
| A5 flyer | 3 cm | 33 | 3.6 mm |
| Poster read from 1.5 m | 15 cm | 33 | 18 mm |
The square count in the middle column is the part nobody mentions. A short link fits in a 21 by 21 grid. A normal link with a few tracking parameters pushes you to 29 or 33. More data means smaller squares at the same width, which means a smaller margin is technically allowed, and also that everything else about the code gets more fragile. We covered that trade in how big a QR code needs to be for print.
You do not have to do any of this math, though. There is a shortcut that works by eye.
Look at one of the big black squares in the corner of your code. That square is exactly seven modules wide. Four modules is a little more than half of it. So: the margin around your code needs to be a bit wider than half a corner square. Hold your thumb over one corner square, imagine slicing it just past the middle, and that is your minimum on every side.
It takes two seconds and it is right every time, at any size, because both things scale together.
Your generator already added the quiet zone. Here is what eats it.
Download a code from any decent generator and the four modules are already in the file. That is the good news and it is also the trap, because it means you stop thinking about the margin at the exact moment it becomes vulnerable.
Five things kill it, roughly in order of how often we see them:
Cropping in a design tool. You place the PNG, it looks like it has too much air around it, so you drag the crop handles in until the black touches the frame. Layout instinct, dead code.
Butting it against a colored block. The margin is still in the file, but you put the code flush against a dark headline bar or a photo. Now there is white on two sides and a hard color edge on the other two. The camera reads the edge as part of the pattern.
Putting a border around it. Rounded rectangles, hairline boxes, a little frame to make it look intentional. If the border sits inside the four modules, it does the same damage as text would. Keep frames outside the margin, not inside it.
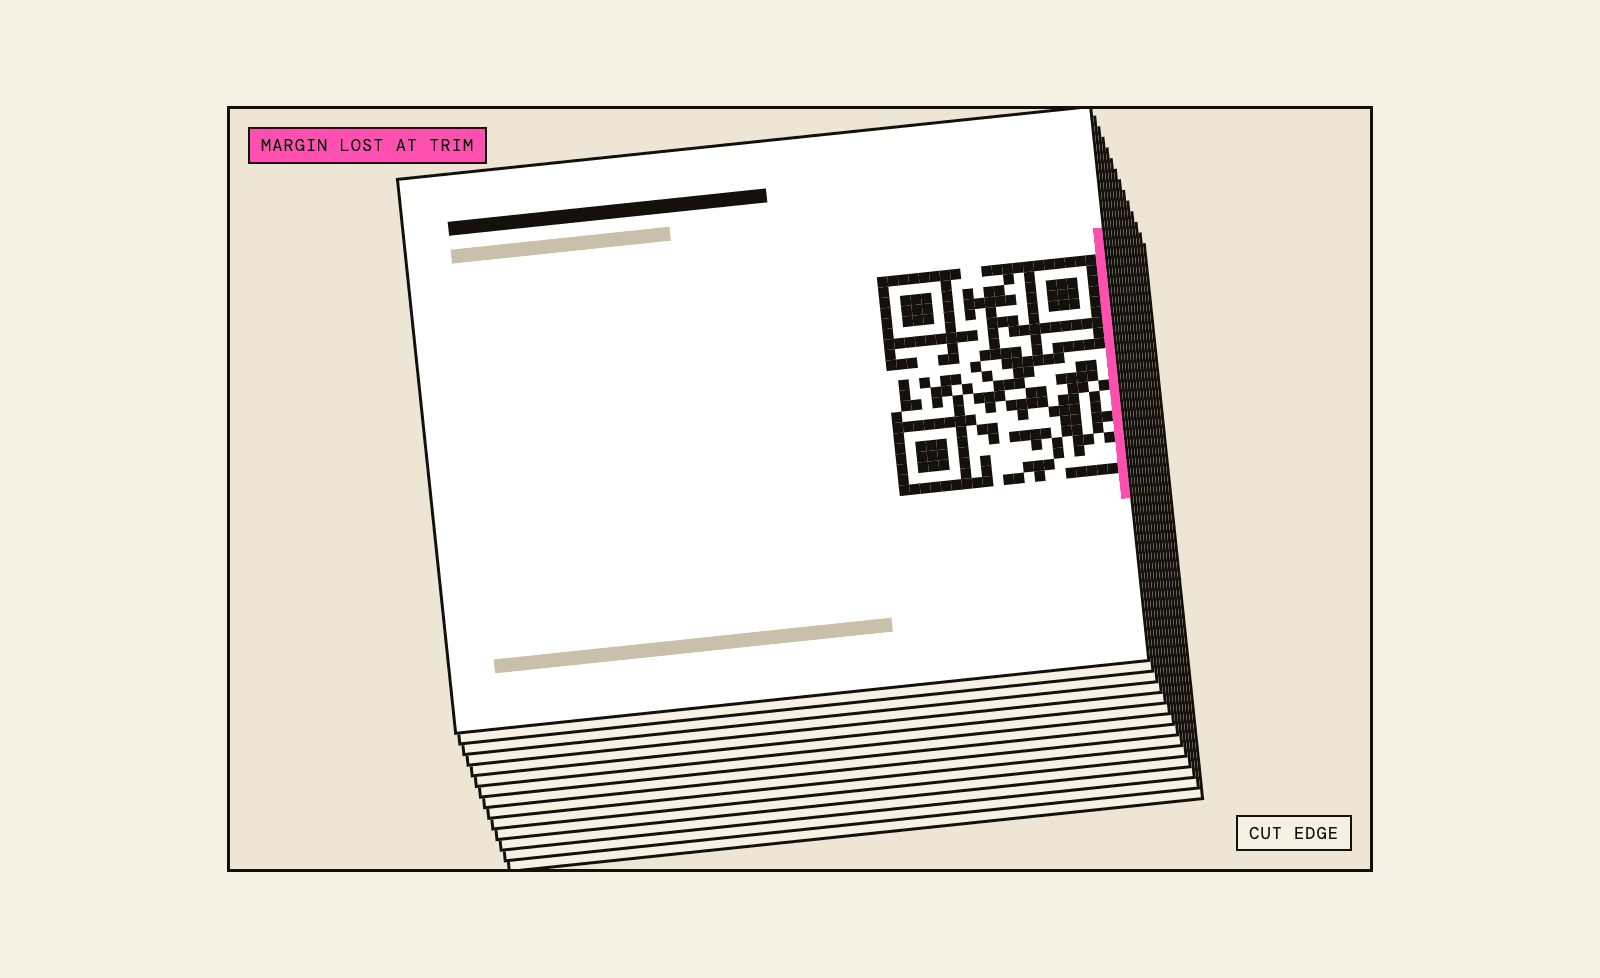
The trim edge. This is the one that costs money, because it survives every check you do on screen and only shows up in the finished stack.
Placing it on a photo. A busy background right up against the code gives the camera exactly the visual noise the quiet zone exists to remove. A code over an image needs a solid light panel underneath it, sized at least four modules bigger than the code on every side.
The quiet zone does not have to be white
Everyone calls it the white border. That is a habit, not a rule.
What the standard asks for is a light, uniform background with strong contrast against the dark modules. Cream, pale gray, a soft pastel: all fine, as long as it is the same tone the code itself sits on and it is clearly lighter than the code.
The failure is not color. It is a change in tone inside the margin. A code on a cream card with a cream margin scans. A code on a cream card with a white box around it and cream beyond that also scans, because the boundary is still clean and the tone is still light. A code with half its margin on cream and half on a dark green stripe does not.
One exception worth knowing: inverted codes, light squares on a dark background. Some phones handle them, some do not, and you have no way to know which one your customer is holding. If you go inverted, the margin has to be the same dark tone as the code background, and you should test on more than one phone before you commit. Honestly, for anything printed at volume, we would just not.
How to test it in 30 seconds
Scanning your own code on your own screen tells you almost nothing. Your phone is 20 cm away, the screen is backlit, and there is no headline crowding the code. Everything scans under those conditions.
Test the layout, not the code:
Export the actual artwork, the page as it will print, not the code on its own.
Print it at real size on the closest paper you have.
Scan it from the distance a real person would stand at.
Then scan it again from an angle, maybe 30 degrees off, in the worst light in the room.
Step four is where quiet zone problems show up. Straight on and well lit, a code with a thin margin often still works. Tilted, in a dim cafe, it stops.
When four modules is not enough
Four is a minimum, not a target. A few situations want more:
Screens. Glare and low brightness cost you contrast at the boundary. Six modules is a common vendor recommendation for on-screen codes. It is a convention, not part of the standard, but it is a cheap one to follow.
Curved surfaces. Cups, bottles, cans. The margin is doing double duty because the code itself is distorting. Give it more room and keep the code on the flattest part of the curve.
Anything at distance. On a poster read from across a room, the camera is resolving a much smaller version of your code than you designed. Extra margin helps the finder patterns survive that.
Going the other way, more margin than about 8 modules buys you nothing. At that point you are just spending layout space.
The honest version
The four-module rule comes from a spec written for scanners in controlled conditions. Modern phone cameras are better at this than that spec assumes, and plenty of codes with two modules of margin scan fine on a recent iPhone in good light.
That does not make the rule optional. It makes it insurance. You do not get to choose which phone, which lighting, or which angle your customer uses, and the cost of being wrong is a reprint. Four modules is cheap. Finding out at the printer is not.
And if you use a real generator, you do not have to do anything to get it. The margin is in the file. This whole article is about not deleting it.
Get a code that arrives with its margin already on.
scanbam builds in the four-module quiet zone and hands you SVG, PNG and PDF. Your only job is to leave it alone.
Open the generatorQuestions people ask about the quiet zone
What is the quiet zone on a QR code?
It is the clear margin around all four sides of the code. Scanners use it to separate the code from whatever is next to it, so they can find the three corner squares. Without it, the camera often does not detect the code at all.
How wide does a QR code quiet zone need to be?
Four modules on every side, where a module is one small square in the grid. That is the ISO/IEC 18004 requirement. By eye, it is a bit more than half the width of one of the big black corner squares.
Does the quiet zone have to be white?
No. It has to be light, uniform, and clearly lighter than the dark squares. Cream, pale gray or a light pastel all work, as long as the tone does not change inside the margin.
Can I crop the white space around my QR code?
Not past four modules. Cropping is the single most common way a working code gets broken, because the margin looks like empty padding in a design tool. Resize the whole image instead, which keeps the ratio intact.
Why does my QR code scan on screen but not on paper?
Usually the layout, not the code. On screen you scan it close, straight on, and with nothing crowding it. On paper the margin is competing with headlines, borders, backgrounds and the trim edge. Test the printed page at real distance and at an angle. Our guide to why QR codes fail to scan walks through the other causes.